
티스토리 뷰

0. QueryDSL이란?
public interface ItemRepository extends JpaRepository<Item, Long> {
    @Query("select i from Item i where i.itemDetail like %:itemDetail% order by i.price desc")
    List<Item>  findByItemDetail(@Param("itemDetail")String itemDetail);
}
위의 코드와 같이 직접 Query문을 작성하게 되면 두 가지의 단점이 있습니다.
1. 문제가 발생하는 경우 런타임 시점에 알게 됩니다.
2. 하나하나 타이핑을 해야한다..
위의 예제는 비교적 짧지만 join이 들어간 경우 여러 줄로 작성해야 했는데 그 과정에서 띄어쓰기로 인해 작동이 안되는 경우를 겪었습니다..
이를 해결하기 위해 QueryDSL을 대신 사용하였습니다.
QueryDSL은 JPQL을 코드로 작성할 수 있도록 도와주는 빌더 API입니다.
장점으로는
- 고정된 SQL문이 아닌 조건에 맞게 동적으로 쿼리를 생성할 수 있다.
- 비슷한 쿼리를 재사용할 수 있으며 제약 조건 조립 및 가독성을 향상시킬 수 있다.
- 문자열이 아닌 자바 소스코드로 작성하기 때문에 컴파일 시점에 오류를 발견할 수 있다.
- IDE의 도움을 받아서 자동 완성 기능을 이용할 수 있기 때문에 생산성을 향상시킬 수 있다.
이제부터 QueryDSL을 적용해보겠습니다.
1. QueryDSL 적용하기
build.gradle
buildscript{
	ext{
		queryDslVersion="5.0.0"
	}
}

plugins {
	id 'java'
	id 'org.springframework.boot' version '2.7.6'
	id 'io.spring.dependency-management' version '1.1.0'
	id "com.ewerk.gradle.plugins.querydsl" version "1.0.10"
}

group = 'com.example'
version = '0.0.1-SNAPSHOT'
sourceCompatibility = '17'

configurations {
	compileOnly {
		extendsFrom annotationProcessor
	}
}

repositories {
	mavenCentral()
}

dependencies {
	...

	implementation "com.querydsl:querydsl-jpa:${queryDslVersion}"
	implementation "com.querydsl:querydsl-apt:${queryDslVersion}"

}

def querydslDir = "$buildDir/generated/querydsl"

querydsl {
	jpa = true
	querydslSourcesDir = querydslDir
}

sourceSets {
	main.java.srcDir querydslDir
}

compileQuerydsl{
	options.annotationProcessorPath = configurations.querydsl
}

configurations {
	compileOnly {
		extendsFrom annotationProcessor
	}
	querydsl.extendsFrom compileClasspath
}

test {
	useJUnitPlatform()
}
위의 코드와 같이 작성하여 QueryDSL을 추가합니다.
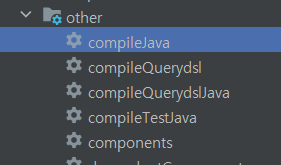
우측 Gradle -> other -> compileJava를 눌러 실행하게 합니다.
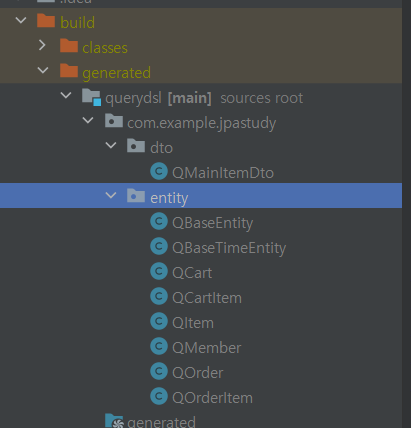
이 과정을 통해 entity로 등록한 클래스의 앞에 Q가 붙은 형태로 만들어진 것을 확인할 수 있습니다.
2. QueryDSL로 대체하기
ItemRepositoryCustom
public interface ItemRepositoryCustom {
    List<Item> findByItemDetail(@Param("itemDetail")String itemDetail);
}
XXXRepositoryCustom이란 이름으로 인터페이스를 생성합니다.
저의 경우 기존의 ItemRepository에서 Query로 작성한 함수들을 여기에 선언하였습니다.
ItemRepositoryCustomImpl
public class ItemRepositoryCustomImpl implements ItemRepositoryCustom {

    private JPAQueryFactory queryFactory;

    public ItemRepositoryCustomImpl(EntityManager entityManager) {
        this.queryFactory = new JPAQueryFactory(entityManager);
    }

    public List<Item> findByItemDetail(@Param("itemDetail")String itemDetail){
        List<Item> result=queryFactory.selectFrom(QItem.item)
                .where(QItem.item.itemDetail.contains(itemDetail))
                .orderBy(QItem.item.price.desc())
                .fetch();

        return result;
    }
}
위의 인터페이스를 구현한 클래스로 XXXRepositoryCustomImpl이란 클래스를 만들었습니다.
이 클래스 안에서 QueryDSL을 이용합니다.
차이점은 Item이 아닌 QItem.item으로 사용하면 되는 부분입니다.
기존의 SQL과 큰 차이가 없어 쉽게 적용할 수 있습니다.
    private JPAQueryFactory queryFactory;

    public ItemRepositoryCustomImpl(EntityManager entityManager) {
        this.queryFactory = new JPAQueryFactory(entityManager);
    }
동적으로 쿼리를 생성하기 위해 JPAQueryFactory를 사용합니다.
생성자로 EntityManager를 넣어줍니다.
ItemRepository
public interface ItemRepository extends JpaRepository<Item, Long>, ItemRepositoryCustom {

}
이제 기존의 ItemRepository에 있는 함수를 제거하고 ItemRepositoryCustom을 추가하면 됩니다.
'server > Spring' 카테고리의 다른 글
| [java] 깊은 복사 VS 얕은 복사 with 실전 코드 (2) | 2024.01.21 |
|---|---|
| [Spring Boot JPA] 카카오페이 단건결제 구현하기 (0) | 2023.05.20 |
| Github Action 시 발생했던 contextLoads() 에러 해결 방법 (0) | 2023.04.19 |
| Spring Boot + S3 사진 파일 업로드 (0) | 2023.04.08 |
| JPA Auditing을 이용한 Entity 공통 속성 설정 (0) | 2023.03.31 |
- Total
- Today
- Yesterday
- RDS
- 영어끝말잇기
- 시스템콜
- 머신러닝
- 괄호회전하기
- dp
- 우분투설치
- springboot
- 운영체제
- PasswordEncoder
- PostgreSQL
- 최고의집합
- 최솟값구하기
- 이진변환반복하기
- 응답코드
- interrupt
- 프리티어
- 프로그래머스
- xv6
- Auditing
- 실패율
- Android
- OS
- ubuntu
- AWS
- 뉴스클러스터링
- 정수삼각형
- 백준
- 다음큰숫자
- qemu
| 일 | 월 | 화 | 수 | 목 | 금 | 토 |
|---|---|---|---|---|---|---|
| 1 | 2 | 3 | 4 | 5 | ||
| 6 | 7 | 8 | 9 | 10 | 11 | 12 |
| 13 | 14 | 15 | 16 | 17 | 18 | 19 |
| 20 | 21 | 22 | 23 | 24 | 25 | 26 |
| 27 | 28 | 29 | 30 |