
티스토리 뷰
흔히 개발 수업 시간에서 배운 call-by-value와 call-by-reference에 대해서 배웠었다.
몇 년만에 왜 이걸 다시 공부하게 되었을까?
기존의 코드
    @Getter
    @RequiredArgsConstructor
    public class Car {
        private Long id;

        private String name;

         private String sellingDate;

        private List<CarPart> carPartList;

        @AllArgsConstructor
        public static class CarPart {
            private Long partId;
            private String partName;
            private boolean isAvailable;
        }
    }
데이터베이스에서 Car 타입의 리스트를 받아온다.
밑의 코드처럼 날짜 정보와 함께 해당 리스트를 불러 온다고 가정하자.
List<Car> carList = carService.getCarsWithDate();- AS-IS
오늘의 차 판매 시간이 지나면 오늘 날짜부터가 아닌 내일 날짜부터의 데이터를 가져온다고 가정해보자.
하지만 우리에게 필요한 건 판매 시간이 지났어도 오늘의 데이터를 가져오는 것이 필요하다. - TO-BE
오늘의 판매 시간이 끝났다고 해도 오늘의 데이터가 필요한 상황이다.
하지만 판매가 끝났기에isAvailable을false값으로 전달하면 될 것 같다.
그렇다면 코드로 난 어떻게 접근했을까?
오늘의 데이터가 없다면 내일의 데이터를 똑같이 가져와서 isAvailable를 false값으로, sellingDate를 오늘로 해서 맨 앞에 추가하자!
- 첫 시도
    public class CarService {
        List<Car.CarPart> carParts = new ArrayList<>(carService().getCarInfos.get(0));
        carParts.forEach(parts -> {
            parts.setIsAvailable(false);
        });
        Car car = new Car(1L, "Car Name", today, carParts);
        carService().getCarInfos.add(0, car);
    }
실패한 원인: Car이란 객체는 깊은 복사를 하였지만 그 안의 CarPart 객체에 대해서는 깊은 복사를 하지 않았기 때문이었다!
그렇기에 모든 새로 만든 car이 아니라 기존의 정보도 다 isAvailable값이 false로 되었다.
- n번째 시도
    public class CarService {
        List<Car.CarPart> carParts = new ArrayList<>(carService.getCarInfos.get(0).getPartsWithDeepCopy());             carParts.forEach(parts -> {
            parts.setIsAvailable(false); });
        Car car = new Car(1L, "Car Name", today, carParts);
        carService().getCarInfos.add(0, car);
    }
@Getter
@NoArgsConstructor
@AllArgsConstructor
public class Car {
private Long id;
private String name;
private List<CarPart> carPartList;
private String sellingDate;
public List<CarPart> getPartsWithDeepCopy(){
return carPartList.stream()
.map(Car::createPartWithDeepCopy).collect(Collectors.toList());
}
public static CarPart createPartWithDeepCopy(CarPart carPart){
ObjectMapper objectMapper = new ObjectMapper();
try{
return objectMapper.readValue(objectMapper.writeValueAsString(carPart), CarPart.class);
}catch (JsonProcessingException e ){
throw new IllegalArgumentException(e);
}
}
@Getter
@Setter
@AllArgsConstructor
@NoArgsConstructor
public static class CarPart {
private Long partId;
private String partName;
private boolean isAvailable;
}
}이제는 createPartWithDeepCopy를 통해 깊은 복사를 해주고 있다!
- 깊은 복사 VS 얕은 복사
1. 얕은 복사
@SpringBootTest
public class CarTest {
    @Test
    @DisplayName("얕은 복사")
    public void carTest(){
        Car.CarPart carPart1 = new Car.CarPart(1L, "바퀴", true);
        Car.CarPart carPart2 = new Car.CarPart(2L, "핸들", true);
        Car.CarPart carPart3 = new Car.CarPart(3L, "시트", true);

        List<Car.CarPart> carPartList = new ArrayList<>();
        carPartList.add(carPart1);
        carPartList.add(carPart2);
        carPartList.add(carPart3);

        Car tomorrowCar = new Car(1L, "차", carPartList, "20240122"); // tomorrow data

        List<Car.CarPart> todayCarPart = tomorrowCar.getCarPartList();
        todayCarPart.forEach(part -> {
                    part.setAvailable(false);
                });
        Car todayCar = new Car(2L, "오늘 차", todayCarPart, "20240121");
        List<Car> carList = new ArrayList<>();
        carList.add(0, todayCar);
        carList.add(1, tomorrowCar);
    }
}
얕은 복사의 경우에는
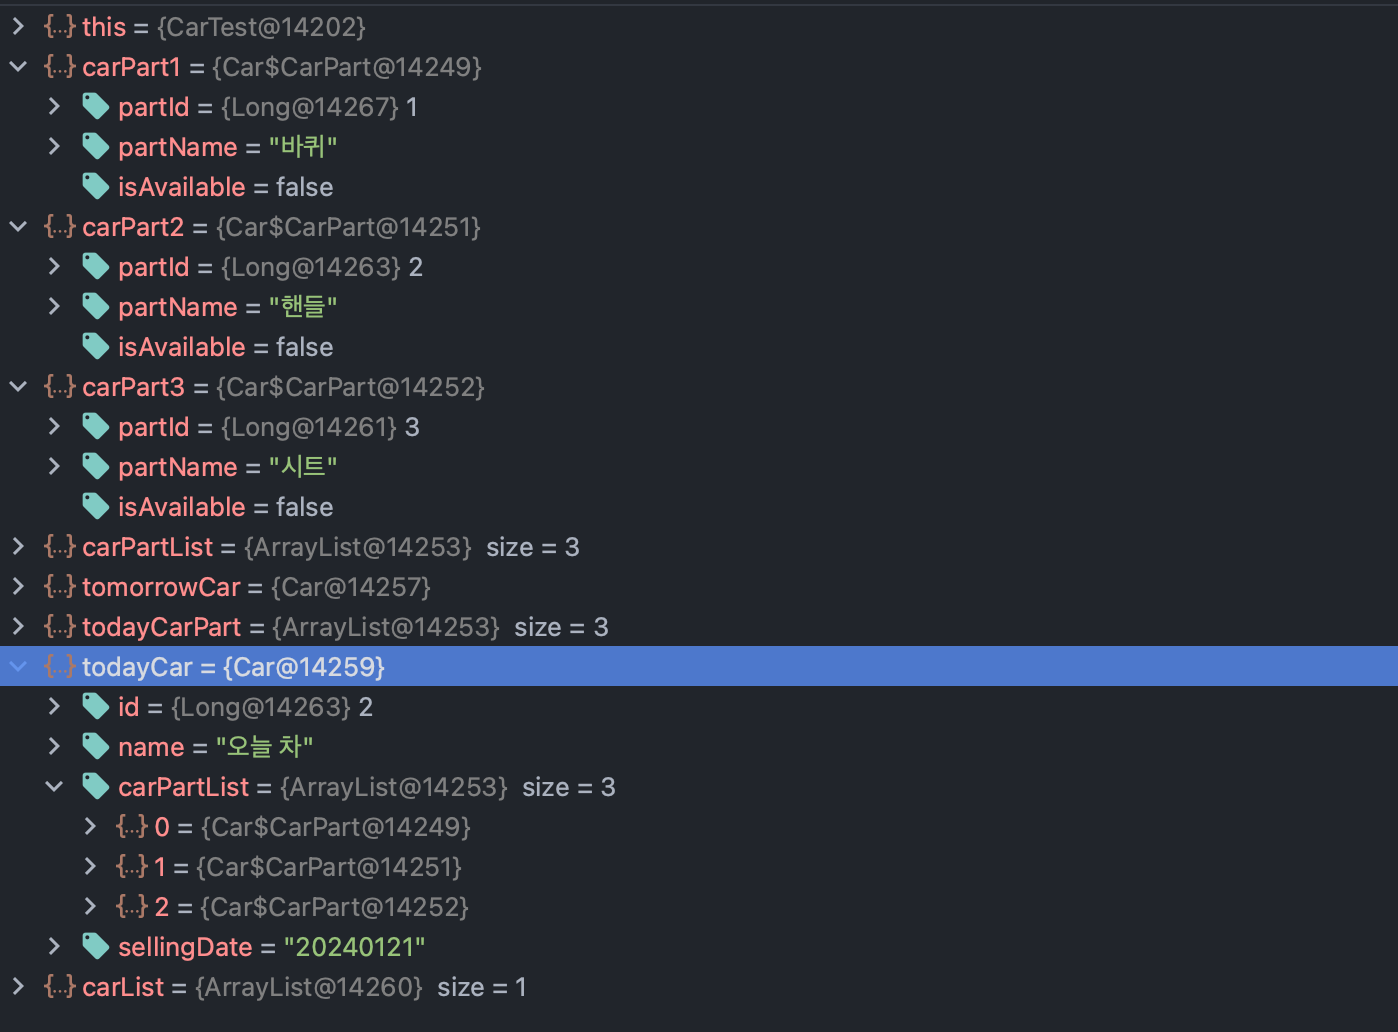
이렇게 새로운 객체이더라도 안의 CarPart는 얕은 복사를 한 것을 알 수 있습니다.
그렇기에 기존의 carPart의 isAvailable의 값들이 모두 false로 바뀐 것을 확인할 수 있습니다.
2. 깊은 복사
@Test
@DisplayName("깊은 복사")
public void carTestWithDeepCopy(){
    Car.CarPart carPart1 = new Car.CarPart(1L, "바퀴", true);
    Car.CarPart carPart2 = new Car.CarPart(2L, "핸들", true);
    Car.CarPart carPart3 = new Car.CarPart(3L, "시트", true);

    List<Car.CarPart> carPartList = new ArrayList<>();
    carPartList.add(carPart1);
    carPartList.add(carPart2);
    carPartList.add(carPart3);

    Car tomorrowCar = new Car(1L, "차", carPartList, "20240122"); // tomorrow data

    List<Car.CarPart> todayCarPart = new ArrayList<>(tomorrowCar.getPartsWithDeepCopy());
    todayCarPart.forEach(part -> {
        part.setAvailable(false);
    });
    Car todayCar = new Car(2L, "오늘 차", todayCarPart, "20240121");
    List<Car> carList = new ArrayList<>();
    carList.add(0, todayCar);
    carList.add(1, tomorrowCar);
}
이렇게 하여 깊은 복사가 이뤄져 객체의 주소가 다르며 값이 다른 것을 확인할 수 있다!
'server > Spring' 카테고리의 다른 글
| [JUnit] @ParameterizedTest와 @ValueSource, @NullAndEmptySource, @CsvSource (0) | 2025.03.17 |
|---|---|
| [Spring Boot JPA] 카카오페이 단건결제 구현하기 (0) | 2023.05.20 |
| [Spring Data JPA] QueryDSL 적용하기 (1) | 2023.04.22 |
| Github Action 시 발생했던 contextLoads() 에러 해결 방법 (0) | 2023.04.19 |
| Spring Boot + S3 사진 파일 업로드 (0) | 2023.04.08 |
공지사항
최근에 올라온 글
최근에 달린 댓글
- Total
- Today
- Yesterday
링크
TAG
- 시스템콜
- 최고의집합
- AWS
- 우분투설치
- 프리티어
- OS
- 뉴스클러스터링
- xv6
- 운영체제
- 프로그래머스
- Android
- dp
- 정수삼각형
- springboot
- ubuntu
- RDS
- 실패율
- 다음큰숫자
- PasswordEncoder
- qemu
- interrupt
- 이진변환반복하기
- 응답코드
- 괄호회전하기
- 머신러닝
- Auditing
- 백준
- 영어끝말잇기
- 최솟값구하기
- PostgreSQL
| 일 | 월 | 화 | 수 | 목 | 금 | 토 |
|---|---|---|---|---|---|---|
| 1 | 2 | 3 | 4 | 5 | ||
| 6 | 7 | 8 | 9 | 10 | 11 | 12 |
| 13 | 14 | 15 | 16 | 17 | 18 | 19 |
| 20 | 21 | 22 | 23 | 24 | 25 | 26 |
| 27 | 28 | 29 | 30 |
글 보관함